

Wargame Design Studio – 2018 Half Yearly Report (Part Two)
Hi All,
Back in March we provided an update on the Western and Mediterranean Panzer Campaign upgrades to Gold. For this half yearly update we’re going to focus on one title and one scenario only from the pending upgrades.

Panzer Campaigns France ’40 Gold is going to dramatically expand the content included with the original France ’40. Two new members have been involved in the upgrade of this title, Mike Prucha and David Michas. David assisted with French naming conventions in Panzer Battles Normandy as well as the French scenarios in the Panzer Battles Demo. Mike is one of our newest members and having seen the work done for the Eastern Front titles, offered a huge body of work he had done for France ’40 as a personal project. The expertise and workload he has bought to the team has been very welcome.
Here is the original campaign, with the map centred on Sedan.

Here is the new Fall Gelb campaign, also centred on Sedan. The extra map and forces should be self-evident. Paris is in the south western corner.

This post has been written by Mike to explain what has been done for the new Fall Gelb campaign. The following is an excerpt from the notes that will come with the game. These are text heavy, so this is a big (but interesting ) read for all!!!
The Map
The most obvious difference between the new scenario and the original is the map – it has been greatly expanded north to include much of the Netherlands, east to include most of the Dutch-German border and Luxembourg, and south into France. The original map cut off just north of Antwerp. This presented several problems. First, it did not provide a historic objective for the French 7th Army. As part of the Allies Plan D with the appended Breda Maneuver, the 7th was responsible for advancing into North Brabant near Breda and, if practical, link the Belgian Fortified Position Antwerp with the Dutch Fortress Holland defenses. With the map cut off at Antwerp it was impossible to recreate this maneuver and the 7th Army had no historical purpose and was likely to be used to bolster the Allied defenses in areas where it did not operate. The second problem posed with the original northern cut off was the placement of German reinforcements. The German 225th and 256th Infantry Divisions approached Antwerp directly from the north (advancing through the southern Netherlands). With the map edge where it was these operations against Antwerp could not faithfully recreated – the northern defenses were not on the map – and the 225th and 256th had to be brought in as reinforcements far east of the areas where they operated historically. To recreate the actions of the 7th Army and the fighting at Antwerp, the map had to be extended at least as far as Moerdijk. This however, still presented a problem – the 9. Panzer Division and LSSAH both advanced beyond the Moerdijk bridges into South Holland. Therefore, the map would be extended as far as Rotterdam (and even that would ignore the “victory tour” taken by 9. Panzer of Dutch cities after the Netherlands surrendered its army). With the map that far north, it made sense just to go further to include all of the airborne operations and the Grebbe Line and ultimately chose a cut off just north of Zwolle and Amsterdam. Extending the map further north to include all the Netherlands would not have been practical given a lack of detailed source maps. Even if the necessary resources were available to create this portion of the Netherlands, the work would not likely have been worth the reward. The Dutch only deployed the thinnest token defense to the Northern provinces and the Germans allocated only one division to this very large area. What scant fighting there was in the northern provinces was disconnected from the rest of the battle and played no significant role in the campaign.
The designers of the original map did have some very sound reasoning concerning the original eastern map edge. The Belgian-German frontier was not seriously defended, and neither was most of Luxembourg. The original eastern cut down on the amount of empty space which Army Group A would have to advance through, which I see as a desirable. However, with the inclusion of more of the Netherlands we had no choice but to extend the map to the east regardless of the empty space it added in Belgium and Luxembourg – we could not do justice to the Battle of the Netherlands without the Maas and IJssel lines. The eastward extension also provides room to recreate the French cavalry actions in southern Luxembourg on May 10th thereby completing the French forward cavalry screen which extended all the way from Tienen in Belgium through the Ardennes and across the southern end of Luxembourg.
The reasoning for the southern extension is a little less obvious and took longer to come upon. The original map provided adequate room to the south to faithfully recreate the German “Sichelschnitt” maneuver – the race to the sea and the encirclement of the Allied northern armies. The Germans did not plunge southwards towards Paris, etc. during the Case Yellow operation that the scenario represents. However, there were some issues that this southern edge presented:
1. The French had very little breathing room to the south. Extending the map southward allows us to place French corps and army headquarters and other corps assets at their historic positions and gives French player the opportunity to reform and regroup some battered divisions in the south before sending north again as they historically did.
2. If French reinforcements are brought in at their historic locations on the original map, they arrive increasingly further to the west as time goes by, first south of the Aisne and then south of the Somme. This was historically a reaction to the northwestwardly advance of the Panzers. This only makes sense if the German had been successful in recreating the German offensive towards the channel ports. If German player is stopped or the campaign develops differently in some other way this westward creep of Allied reinforcements could seem illogical and disconnected from the campaign game as it has unfolded. Extending the map to the south will place some of the reinforcements on the map and those that arrive will have sufficient room for the French player to deploy them in reaction to the way the game has actually played out rather than assuming that it has unfolded historically.
3. This final reason, in mind, far outweighs the first two and, I think, was the decisive argument in favor of the southern extension. When the German Panzer divisions emerged from the Ardennes and pierced the Meuse front at Sedan, there was a range of possibilities open to them and the French were entirely uncertain about German intentions. The Panzers could have pushed south towards Verdun, east towards Metz or Nancy, or southwest to Paris. The rear of the Maginot Line was vulnerable and Paris up for grabs. It was not quite a week after the Sedan breakthrough that the French fully grasped the vector of the German attack – towards the channel ports with the aim of encircling the northern armies. The original map makes the game a sort of “one-way street.” The possibilities historically open to the Germans are irrelevant because the map does not allow for them. The French player is therefore certain of the German player’s intention because he can only have one: the capture of Dunkirk. By extending the map southwards we open up possibilities. The Germans have more room to maneuver and, depending on how victory hexes are placed, maybe even more than one way to win. The French player must consider and defend against all possibilities rather than just one, and therefore the very real uncertainty experienced by the French high command is imposed upon the French player in a way that it cannot be on the smaller map.
In addition to expanding the map we have added many small villages, redrawn to boundaries of certain towns and cities to better reflect their appearance in the 1940s, and added hundreds if not thousands of labels to previously unnamed villages. As a little bonus we’ve added other labels for Allied airfields and other points of interest.
The Order of Battle
The campaign uses an all new order of battle. I have added several Allied and German infantry divisions that were not present in the original OOB, including the complete French 3rd Army, German 16th and 18th armies (only partially represented in the original OOB) and of course the Dutch Army. of these divisions were added as result of the map extensions while others were present in the original map area but were not included in the original OOB. Another major addition is the inclusion of Allied and all German anti-aircraft elements, including the Allied regional defenses. The German Flak battalions played an exceptionally important role during the Western Campaign and inflicted incredible losses on Allied bombers at Sedan and Maastricht and I felt that it was important to reflect this. The Allies AA defenses were less impressive, but still important in certain scenarios. Dutch AA batteries played an important role in defending the airfields from German air landing troops and paratroopers on May 10th, British 3.7-inch guns were used quite effectively in an AT role at Calais, and the French regional defenses at Dunkerque were a secondary but still important factor in limiting the Luftwaffe’s success in late May. I have also added French General Reserve artillery (a mass of artillery regiments at the disposal of GQG which could be attached as needed to various formations). Because these regiments were not organic to any formation they can be quite difficult to research and trace (I am guessing this is why they were not included in the original), but many of these regiments did participate in the fighting and are necessary in the OOB. The last major addition is the presence of the French regional regiments and Belgian territorial battalions and guard battalions. Normally rear area units like these are not included in PzC OOBs, however for France ’40 I felt it necessary. After the Panzer breakthrough the French regional troops were in many places the only forces available to counter the threat. Regional infantry regiments and protection regiments clashed with German motorized troops and Panzers at Péronne, Amiens, Boulogne, and in the Dunkirk Pocket. If the Panzers had shot south towards Paris, there would be few assets other than the regional troops to protect the city. Rear security troops also participated in the fighting in the Netherlands. Depot guard companies helped defend Rotterdam, the Hague, and the Ockenburg Airfield and have therefore been included in the OOB. The Belgian security troops mostly stayed out of the fighting, but I wished to include them for the sake of consistency between the various Allied armies.
In addition to expanding the OOB, the existing French, British, Belgian, Dutch, and German formations have been heavily revised to better reflect the organization and composition of those nations’ armies in 1940. The basic composition of the British, French, and German divisions has remained basically the same, but there have been some changes, especially to the composition of artillery units (the 25 pounder had fully not replaced older WWI designs among British territorial regiments, the Germans were using a lot of Czech artillery in some of the more recently levied infantry divisions, and the French had a much greater variety of different pieces than was originally represented). The French fortress regiments have also been totally redone. They are now accurately depicted as machine gun battalions (except those in the Fortified Sector of Faulquemont which were organized as normal infantry regiments). The ouvrage garrisons themselves are represented as immobile heavy weapons companies. Some of the larger ouvrages also have an artillery battery. The Belgian army had been given a complete makeover. These changes have been made possible by various online and print resources that were published after the release of the original game.
As with most PzC games, battalion weapons companies have been omitted and their contents have been accounted for in the infantry company unit values. I debated for some time if the regimental weapons companies should be included – some PzC games include them and others don’t. I ultimately decided to include them for two reasons: 1. After playtesting the new Abbeville and Gembloux scenarios it seemed clear that for these scenarios to work as intended both the French and Germans needed some AT capability beyond what could be provided in the French divisional AT company and battery and in the German AT battalion. The only options would be to explore giving an organic AT value to French and German infantry companies or to include the regimental weapons companies. I preferred the latter option. 2. In the Dutch Peel Division (central to the first two days of fighting in the Netherlands) had almost no artillery other than the 60mm canons and 80mm mortars in the regimental weapons companies. Because of this it really seemed that the Dutch needed to have the regimental weapons companies represented on the map. I reasoned that if they are included for the Dutch Army then they should be included for the other armies as well. For the French regimental weapons companies, I took a bit of liberty. Technically they would have had six 25mm AT guns and 2 81mm mortars. After experimenting with a few possible solutions, I simplified these to a single company of six AT guns. This seemed to fit the game system better than other alternatives and provided what I wanted in terms of AT capability.
Upon a recommendation from veteran PzC Order of Battle designer Mike Avanzini I chose to simplify some mixed battalions:
1. German divisional recon groups in the First Wave divisions have two horse squadrons rather than one horse and one bicycle
2. German Pionier battalions which had two foot companies and one motorized are all foot
3. Mixed truck/motorcycle battalions in the German rifle regiments are all truck
4. Mixed truck/motorcycle squadron groups in the French régiments de dragons portés type DLM are all truck.
These simplifications allow us to combine these companies/squadrons into battalions. There a few instances in which I chose not to simplify similar mixed battalions. I have left the French divisional recon groups with one horse and one motorcycle squadron. The difference in movement values between these two squadrons is very great and historically the French often separated the horse and motorcycle squadrons. It seemed like we really had to represent both movement types in the GRDI. The Dutch Hussar were split between several horse and bicycle squadrons. I initially planned to simply these just as I had with the German recon groups, but because the Dutch Hussar regiments had no battalion commands (the various squadrons reported directly to the regimental commander) this meant that the squadrons could be combined to form one large unit of more than 1000 men. I decided to keep the Hussar regiments mixed to prevent this.
All infantry battalions can now be broken down into companies. In the original OOB only German, British, and active army French infantry divisions could be broken down into companies – all Belgian and French reserve battalions were stuck at the battalion level. This does take away a certain flexibility from the Belgians and French and therefore gives the German player an advantage (which may be good thing). However, many of the Belgian and French divisions (especially French) held a very wide frontage that cannot be adequately represented when the battalions cannot be broken down. This is especially apparent in the French defenses from Luxembourg to the Meuse where the large gaps between battalion found in the original are not representative of what actually was a reasonably strong French position. Certain scenarios I think benefit greatly from having Allied battalions break down into companies. For instance, when 4. Panzer crosses the Albert canal in the original, the spread out Belgian battalions are easily encircled and eliminated, and the matter is settled. With the Belgian at the company level, 4. Panzer’s riflemen will have to spend time clearing the Albert canal trenches. The initial advance is more difficult due to more overlapping ZoCs, but gradually the Belgian lines bulge to the west and then finally snap, allowing the Panzers to spring forward. I find the second option to be more interesting and it better models the fighting on and behind the Albert canal on May 10th-11th. The drawback is that in some scenarios in which the Allies were densely packed according to doctrine the map can become cluttered and this might actually make it harder for the Germans. Ultimately the decision came to down to comparing the pros and cons of allowing the various allies to break down into companies or not and I decided the pros outweighed the cons.
Unit values are based on the Alt values and are mostly very similar, though there are some differences. I disagree with the very high assault values accorded to Belgian units in the Alt oob and have scaled these down to be more consistent with the French and British. The values for French light tanks have been adjusted a bit as well to better reflect the identical armament of the FCM 36, H35, and R35. I have also switched the speed values of the H35 and R35. French infantry has had their soft value increased from 5 to 6 while Dutch infantry have had their soft value decreased from 6 to five. Belgian, Dutch, and French engineers have had their assault values and soft values lowered to reflect that these were not equipped as assault engineers and had nothing in the way of automatic weapons (all of these were only armed with rifles). Lastly, I have created to variants of British and German infantry to reflect the poor armament of the British LoC “digging divisions” and the absence of trench mortars in the German 3rd-7th wave infantry divisions and most 2nd Wave divisions. All the adjustments have been minor and fit very well within the “spirit” of the alt values and the game plays very similarly.
Morale values are tricky –we are trying to quantify something that is fickle and not strictly definable. Still, a decision needs to be made and a letter assigned to every unit in the game. I have adopted a system very similar to that of the original design team. I have taken Quality C as a starting point – I interpret this as meaning that a unit is well-drilled and reasonably well-motivated but lacking in actual battle experience. Quality D and E represent less capable units (either due to a lack of training, a lack of motivation, or other factors which may have negatively impacted morale). Quality B is used for German divisions that fought in Poland and a few Allied divisions which fought exceptionally well. Quality A is reserved for a handful Germany’s finest formations. Here is a Rough Breakdown:
Germany
A: I.R. “Grossdeutsland,” 1st & 7th Panzer, 7. Flieger-Division, Sturmabteilung Koch
B: 1st & 2nd Wave divisions that fought in Poland, 1st Cavalry, 1st Mountain, SS-V, LSSAH, remaining Panzer divisions
C: 1st and 2nd Wave divisions that did not fight in Poland, SS-Totenkopf, Polizei-Division
D: 3rd-8th Wave Infantry Divisions
France
B: Foreign Legion and Spahis
C: Active Army; Series A chasseurs, tirailleurs, and Zouaves
D: Series A & B reserves (except series A chasseurs, zouaves, and tirailleurs)
E: Series B reserves of the 2nd and 9th armies and regional troops
Britain
B: Guards
C: Regular Army
D: 1st Line Territorials
E: 2nd Line Territorials (LoC divisions)
Belgium
C: Active Ardennes Chasseurs, Active Cavalry, Border Cyclists
D: Active army except those mentioned above, 1st Reserve
E: 2nd Reserve and Line of Communications troops
Netherlands
C: Light Division, Cavalry, and Marines
D: “Low Number Regiments”
E: “High Number Regiments”
You may notice that quality rating for the British Territorials is less than it is in the original OOB (the original used Quality C for 1st Line Territorials and Quality D for 2nd Line). Owing to a shortage of trained officers and NCOs, many (not all) of the territorial battalions were not adequately drilled. Most had only been trained to use their weapons but had received no instruction in basic squad tactics or maneuver. Owing to the lack of training among territorials and the British leadership’s hesitancy to commit the 1st Line Territorial Divisions to battle until it became necessary, I did not think that it would justified to give them the same quality rating as the British Regulars. The 2nd Line Territorial Divisions were another matter entirely. These had been sent to France (sans artillery, transport, and AT guns) in the Spring of 1940 primarily for labor duties. When these divisions were committed to combat in the second week of the campaign many of the men had yet to fire a rifle. Many authors (especially British) take care to state these untrained men fought with great courage and I have no reason to doubt this assessment, however the fact remains that these divisions were dismembered in a matter of hours (2-3 game turns) and this can only be recreated if they are assigned a particularly low-quality rating.
There a few exceptions for the allies. I have singled out Frances 3rd Motorized Infantry Division and 14th Infantry Division to be Quality B. Bertin-Boussus’ 3e DIM has been referred to as the best Allied division of the campaign. The division stood toe to toe with 10th Panzer and IR Grossdeutschland at Stonne and handily repulsed Germany infantry attacks against Mont Dieu on May 17th and 23rd. Jean de Lattre de Tassigny’s 14e DI earned the nickname “Iron Division.” Aside for one battalion lost on the Ardennes Canal on May 15th, the division was largely intact weeks into June. This was not for a lack of fighting – the division fought bitterly at Rethel in May and June. For the British, the regulars in Bernard Montgomery’s 3rd Infantry Division have been upped to Quality B and the territorials to Quality C. Much has been made of Monty’s relentless training of the division during the Phony War (in contrast to the 4th Infantry Division, in which the men had done little but build bunkers). The division expertly defended against the German probing attacks at Louvain on May 14th-16th and its rapid march northward on May 27th-28th to fill the gap left by the surrendered Belgian army was critical in saving the BEF. Belgium’s 4th Infantry Division, though an active formation is Quality E. It has been described in multiple sources as “the worst division in the Belgian army.” It seems to have suffered from an incredibly weak cadre of officers and NCOs and the men in a couple of the regiments were strongly aligned with a Flemish nationalist group with Nazi sympathies. The actions of elements of this division on the Albert Canal and on the Lys were insubordinate if not treasonous – I may downgrade a couple of this division’s regiments to Quality F before the game is released. There are of course many Allied and German divisions which also could deviate from the norm, but it is impractical to come up with a separate morale rating for each division and I don’t want to load up the Allies with too many Quality A and B units – they did lose, after all. I have strongly considered making Belgian 1st-3rd Ardennes Chasseurs Regiments and the Border Cyclists Quality B – these were dedicated professionals (in contrast to the conscripts who filled most of the French and German ranks and the rest of the Belgian army) who were highly trained and motivated and fought with exceptional skill and courage even when it was clear that the Belgian Army was all but finished (Rommel dubbed the Ardennes Chasseurs the “Green Devils”). Though a case could be made for assessing these units as Quality B, I am concerned that this could make it nigh impossible for the Germans to cross the Ardennes in a timely fashion if the Allied player chose to defend the region.
The Campaign
I have made several versions of the campaign with different lengths and with different characteristics:
#0510_01A1_Campaign_Prucha – Ends May 26th, Wired Bridges, 1 Path to Germany Victory
#0510_01A2_Campaign_Prucha – Ends May 26th, Manual Bridge Destruction, 1 Path to Germany Victory
#0510_01B1_Campaign_Prucha – Ends June 4th, Wired Bridges, 1 Path to Germany Victory
#0510_01B2_Campaign_Prucha – Ends June 4th, Manual Bridge Destruction, 1 Path to Germany Victory
#0510_01B3_Campaign_Prucha - Ends June 4th, Wired Bridges, 2 Paths to Germany Victory
#0510_01B4_Campaign_Prucha – Ends June 4th, Manual Bridge Destruction, 2 Paths to Germany Victory
Timeframe
I wanted to extend the campaign further into Fall Gelb than the original did. I at first decided that May 26th was logical end date. This only skirts the Dunkerque evacuations and avoids the question of Belgian surrender altogether. When we found out that we will be able to import surrender hexes over from John Tiller’s The First Blitzkrieg I realized that we could make a campaign covering the entirety of Fall Gelb. Both of these end dates are used in different versions.
Wired Bridges vs. Manual Bridge Destruction
Choosing between the wired bridge option and manual bridge destruction was a tough call. Wired bridges model the preplanned Allied demolitions in the Ardennes and along the Maas/Meuse and Albert Canal exceptionally well – in fact it exactly those sorts of things that the wired bridge rule was designed to cover. However, as the campaign progresses the wired bridge rule becomes less satisfactory. The Allies had not prearranged the destruction of bridges far the rear areas. If we wire too many bridges in the rear than we possibly create too much of a challenge for the Germans (I thought that this was a problem in the original campaign) but if we error on the side of wiring fewer bridges than we potentially put the allies in a position where they hold a river in force but cannot destroy a single bridge over it. In summation, the wired bridge rules model the first few days of the campaign exceptionally well but not so much after that while normal manual bridge destruction is good for the most of the campaign but not good for modelling the prearranged destruction carried out by the Dutch, Belgians, Luxembourgers, and French in the first crucial days. Rather than choosing one option, I decided to make wired bridge versions (#0510_01A1, 01B1, & 01B3) and manual bridge destruction versions (#0510_01A2, 01B2, & 01B4) and the player may choose which he prefers. In the manual versions bridges in the Ardennes and in the Netherlands will start destroyed (even though they technically would have been destroyed a few hours after the start of the campaign) and some engineer units will start the scenario unfixed or come unfixed sooner.
Deployment
The initial deployment of both the Allies and Germans has been altered substantially from the original scenario. In the case of the Dutch and the Belgians there are some excellent maps and resources available online which have allowed for a very detailed and quite precise recreation of the deployment of the armies, down to the battalion or company level for the Belgians and regiment and battalion level for the Dutch. Similar resources do not exist covering the entirety of the French, British, or German armies. In all cases we can be sure that positions held by the divisions are accurate or reasonably accurate, but we do not necessarily have a picture of the deployment of individual battalions. Some sectors which are better documented have been recreated as exactingly as the Belgian and Dutch deployments have. Placing the French general reserve artillery, engineer, and anti-tank units was especially difficult. Some these units were assigned to various army and corps before or on the first day of the campaign, but many were not assigned until after the campaign started (and some were never formally assigned to a corps or army at all). For these RG regiments and battalions that were not assigned from the start, I have not information regarding their initial deployment. I have placed them at their mobilization centers or as reinforcements coming from their mobilization centers. I think that this is almost certainly incorrect, and I suspect that these regiments would have mostly been grouped behind the 3rd and 4th Armies along with the divisions that were at the disposal of GQG. I can’t prove this, though, and the mobilization center is the last verifiable position before their assignment to a corps or army.
Reinforcements
Both the French and the Germans receive a steady supply of reinforcements throughout the campaign. Railroad reinforcements are handled a bit differently than in the original scenario. It generally took several days for a division to embark and to deploy in its entirety elsewhere. Guy Chapman in Why France Fell describes French trains carrying as carrying a couple of battalions at time. The divisions that defended the Aisne and Somme Rivers after the German breakthrough arrived piecemeal as elements were left behind waiting for transport. To model this, divisions which arrive as rail reinforcements will come in chunks rather than all at once. Some French and a few Belgian units were mobilized after the campaign started. These appear at their mobilization centers at the proper time or arrive as reinforcements from the direction of their mobilization centers. Some will remain fixe for a few turns or even days before they can be used.
Fortifications
Fortified lines and positions were constructed by all of the participating parties and played a significant role in the unfolding of the campaign (often by dictating where the Germans did not attack). The original scenario included a representation of the Belgian Namur, Liège, and Antwerp fortifications, but I did not think that it did justice to the strength of these positions. The Belgian KW Line, Albert Canal Line, and other lesser fortified positions were not represented. Neither was the northern extension of the Maginot represented beyond a handful of bunkers mostly clustered in the vicinity of Sedan (which was actually one of the weaker sub sectors). I have represented all of these lines in France, Belgium, and the Netherlands through the placement of bunkers, trenches, pillboxes, obstacles, and in some cases anti-tank ditches. Strong fortified lines have less or no space between bunker hexes while the weak lines have wider intervals between bunkers. This is an abstraction, but I think models the relative strength of each position well. PIllbox hexes have been reserved to represent the Maginot ouvrages and the Maginot-style fortifications of the Belgian Liège fortress system. Except on the border with France the Westwall has not been included. I might consider adding a representation of the Westwall sometime in the future, however this would be done strictly for historical interest and comparison as it played no role in the campaign. If it is included it would look quite a bit different from the Maginot Line. The Westwall was constructed in bands bunkers that were not as densely packed (especially in 1940) but offered much more depth than dense but thin Maginot Line.
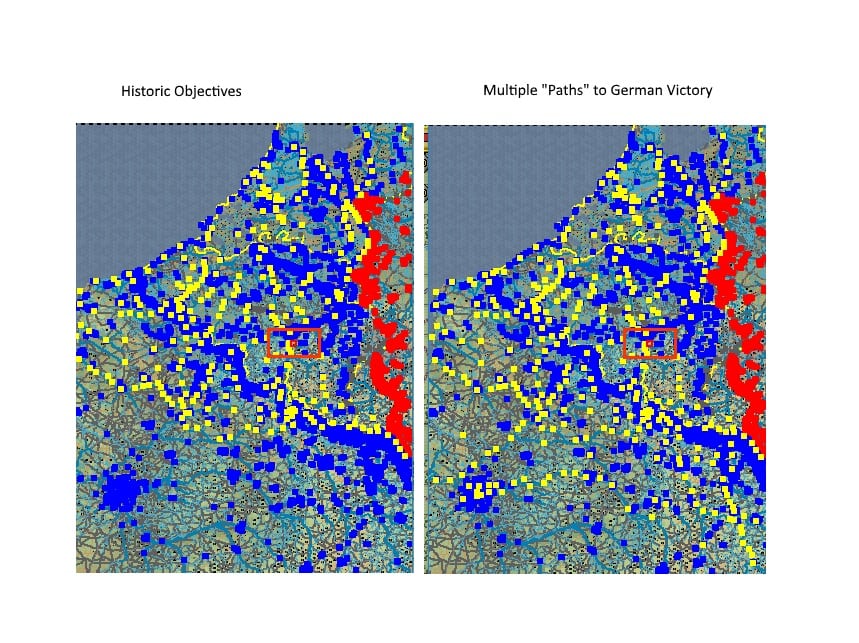
Objectives and Victory Conditions and Suggested Strategies
In placing objective hexes and setting victory conditions I wanted to provide the Allied Player a strong incentive to send French and British divisions into the low countries. The point totals of the objective hexes in Belgium and the Netherlands are sufficient to provide the German player with a minor victory. The Belgian and Dutch armies cannot hold out against the Wehrmacht indefinitely – without support from Britain they collapse unless the German player is exceptionally incompetent. Therefore, if the Allied player chooses to camp the French and British armies along the French border defenses rather than intervene in the Low Countries, he loses. The only way for Allied player to win is to send a strong force into the Low Countries to prevent the Germans from capturing these objective hexes. In the Netherlands the victory hexes are deployed along principal Dutch fortified lines and very valuable objective hexes are set in the major Dutch cities – this to reflect that Rotterdam, the Hague, and Breda were all major German objectives. In Belgium there are no major objective hexes in the main cities (and none in Brussels which was declared an open city). Instead the objective points are dispersed in bands along the various lines that the Allies held. The most valuable is the line of objective hexes running down the KW line and across the Gembloux Gap. There Albert Canal Line has few objective hexes as this was only intended to be a temporary position.
To win a major victory, the German player must achieve decisive territorial gains in France. There is a very steep gap between a German minor victory and a German major victory. There are two variations objective hex placement in France. One represents only the historic “Sickle Cut” (#0510_01A1 & 01A2, #0510_01B1 & 01B2) move while the other (#0510_01B3 & 01B4) provides the German player three possible paths to a major victory:
1. Recreate the German “Sichelschnitt” (historic option)
a. Occupy the Low Countries
b. Pierce the Meuse defenses from Sedan to Namur
c. Secure the Aisne and Somme Rivers
d. Occupy the territory north of the Somme and Aisne
e. Capture the Channel Ports
2. Outflank the Maginot Line
a. Occupy the Low Countries
b. Pierce the Meuse defenses from Sedan to Namur
c. Secure the Marne River south to Neufchâteau
d. Capture key points in front of and behind the Maginot Line
e. Occupy Metz, Nancy, and Épinal
3. Capture Paris
a. Occupy the Low Countries
b. Pierce the Meuse defenses from Sedan to Namur
c. Secure the Aisne, Somme, and Marne rivers
d. Occupy the suburbs of Paris
e. Occupy Paris
Though in some versions of the scenario the German player has three possible paths to victory, he would be wise to pursue only one. All three “paths” will only lead to a major victory if the German pursues them to their conclusion. Without the Channel ports, Paris, or Metz, Nancy and Épinal the German player is very unlikely to win a major victory. If he disperses his forces and fritters them off in pursuit of all three or even two of the three he is unlikely to be successful – as powerful as the German army of 1940 was, it does not have the resources to accomplish everything at once. Though the German player will eventually need to commit to one of these options, he does not need to decide right away. Sedan is a natural jumping off point for all three of the options – the German player can wait a few days to see how the situation unfolds and how the French player reacts before committing to an option. I do think that Option 1 is probably the best option. If the Allied player commits much of GA 1 to the Low Countries (which he must if he wants to win) than the northern region of France will be exceptionally undefended. Furthermore option 1 allows for close cooperation between Army Group A and B. Option 3 is probably a good second choice as Paris will likely be quite vulnerable. The drawback, however, is that this option is likely to separate the Panzers from the infantry by too wide a margin and make them vulnerable to encirclement. Option 3 could be difficult as the Germans would have to advance towards French reinforcements rather than away from them,the hilly and wooded terrain strongly favors the defense, and the German player would have to contend with the Metz and Verdun fortifications.
The Dunkerque Evacuations
One challenge with creating the complete Fall Gelb scenario from May 10th-June 4th was modelling the Dunkerque evacuations. I initially thought that this was utterly impossible and that the campaign could end no later than May 25th-26th. Then I remembered that units can be withdrawn from the map if they are next to a water hex. I decided to provide the Allies with some exit hexes at the Dunkerque harbor and on the beaches east of the city. The Allied player can score some objective points by withdrawing units from these hexes. I re-scaled all objective hex values upwards to ensure that the Allied player cannot win by simply abandoning northern France and the Low Countries and retreating to Great Britain. Withdrawing large portions of GA 1 will not offset the resultant loss of objective hexes in Belgium, the Netherlands, and northern France and is not a means by which the Allies can win the game. The purpose of these exit is to recover some objective points that have been or will be lost to the Germans. For instance, if the fall of Dunkerque seems certain, the Allied may want to withdraw a portion of his army through the exit hexes to blunt the effective of the Germans capturing the channel ports. This is unlikely to win the game for the Allies, but it may deprive the Germans of a major victory or even force a draw. It is desirable that players agree to the following restrictions on using the evacuation hexes, though to my knowledge there is no way to enforce this:
1. No Allied units of any type or nation may be evacuated prior to May 26th.
2. No Allied units of any type or nation may be evacuated if the Allies hold any one of the following locations: Tournai, Arras, Boulogne-sur-Mer.
3. Belgian units may only be evacuated if Belgian surrender routine has been initiated (Germans control all Belgian surrender hexes).
4. French units may not be evacuated prior to May 31st.
In a human vs. human game, it is desirable that both players agree to the above rules before beginning play.
Other Suggested Rules for Multiplayer Campaigns
The disaster which unfolded in May of 1940 was largely the result of decisions taken by and poor coordination between the various Allied commands. To help facilitate a historic result, it is suggested that the Allied player abide by the following restrictions/rules regarding his opening moves:
1. All divisions and other units of the French 7th Army, BEF, French 1st Army, and the French II Corps and XI Corps which are unfixed on May 15th or earlier must move to defensive positions in Belgium and the Netherlands as soon as they become unfixed.
2. The French 1st North African Infantry Division, 43rd Infantry Division, and 1st Armored Division must move to the French-Belgian border or into Belgium behind the French 1st Army.
3. All Belgian units south or east of the Meuse River in the Ardennes must be withdrawn to the other side of the Meuse after becoming unfixed. Individual companies which are spotted by the Germans may stand and fight until nightfall on May 10th, after which they must withdraw.
4. No Belgian units may enter the Netherlands unless the Dutch Army has surrendered.
5. The Dutch 5th, 6th, and Light Divisions must move north of the Linge immediately after becoming unfixed (except the Light Division’s Motorcycle Regiment)
6. Polish Divisions must remain in reserve unless the Germans are spotted as far south as Verdun.
7. Observe restrictions on the Dunkerque evacuations as described above.
These rules are entirely optional, and the Allied player is free to ignore them and explore other alternatives. They are only meant as suggestions which may help place the Allies in the predicament they historically faced. In a multiplayer game both players should discuss and agree as to whether these rules are to be observed or not.
Human vs A/I Play in the Campaign Scenario.
With the help of a few thoughtful A/I orders and with clear objectives, the computer can be a capable opponent in smaller scenarios. Given the enormous scope of Fall Gelb and complexity of both German and Allied maneuvers, I am afraid that campaign scenario is probably best experienced in human vs. human play. If a player does want to face the computer in the campaign scenario, I strongly recommend that he choose either version A1 or A2 (the shorter versions). Versions B3 and B4 which are very long and include multiple ways in which the German player can win are strictly intended for human vs. human play.
Mike Prucha
Here are some additional shots from the Fall Geld Campaign scenario;


Leave a comment