

France ’40 Mega-Update Sneak Peek and WDS Summer Sale Starts
Hi all,
Ready, set, go! The Wargame Design Studio Summer Sale is live. To celebrate we wanted to share another body of work that has just been completed and will be made available when the Panzer Campaigns 4.01 updates are released in the coming second half of the year.

Back at the end of 2018, Mike Prucha and David Michas released a hugely expanded Panzer Campaigns France ’40 title with the inclusion of the Netherlands campaign and a huge number of new and revised scenarios. You can read about that here: France '40 Gold Release and here France '40 Gold Update
The boys can never leave their opus alone and Mike has proclaimed that this will continue to be a lifetime work! With that in mind, Mike has written what is coming in the next iteration of Panzer Campaigns France ’40. This is again an almost new game and takes into account much of the feedback given to date as well as expansion of the whole scope of the game.
In Mike’s words:
Map
The map has been dramatically expanded. It now extends north to cover the northern provinces of the Netherlands and eastwards to the Rhine, including much of Alsace.
Here’s the Jump maps from the original release, the Prucha scenario from the Gold release, and the new map for the upcoming update:

Here’s some screenshots from the added sections. Big thanks to Bill Peters for providing most of the eastern addition:


Note that the interior of Germany has been left impassable - this is to reduce time spent pushing units through Germany and to speed the design process along.
Additionally, the map has been fleshed out with additional details including secondary roads, hundreds of additional villages, revisions to elevations, and additional terrain types, including bocage terrain near Avesnes and Boulogne-sur-Mer.
Here is the vicinity of Aire-sur-la-Lys on the original F40 map, the “Prucha” map from the Gold release, and the map from the upcoming update.

Here’s the Sedan sector shown on a period topographic map:

Here is the Sedan sector shown on the original map, the Gold map, and the new update. Note that in the new update the course of the Meuse better conforms to the real river, and the Meuse valley is deeper as shown in the topographic map.

As in Scheldt ‘44, the otherwise unused Jungle terrain type has been modified to represent defensive inundations. Units can only cross the inundations very slowly and will be quite vulnerable to enemy fire. Below you can see the Dutch Zanddijk Position, with flooded hexes.

While fleshing out the map, I discovered many incorrect elevations. To be clear, elevations are one of the most difficult things to represent in a Panzer Campaigns map because contours rarely conform perfectly to hexes, so, there will always be a certain margin of error and some need for interpretation. But in Luxembourg and Lorraine, in particular, there were wide swaths of terrain off by 100+ meters, sometimes making it appear that rivers flow uphill. As much as possible, these has been corrected (or at least made better).
Here’s the Moselle River in the Gold map, you can see that it appears to flow from low terrain to high terrain:

Comparison to topographic maps, of course, shows that this is incorrect. The corrected version of the map is below - you can see that Thionville is situated in a valley rather than a bowl.

One common problem with the old map occurred at locations where roads and railroads run parallel to rivers. This can be tricky because a road and a railroad cannot pass through the same hexside. The solution had sometimes been to “twist” the roads and rails around the river as seen on the Chiers river below.

While this kept these roads & railroads close to their actual position, it generated way more bridges and crossing sites than are (were) actually there. These have been altered to ensure that there are no more bridges than there should be. This usually meant offsetting a railroad by a hex, which, though imperfect, seemed preferable to adding crossing sites. Below is the same stretch of the Chiers, but with the railroad offset so as not to generate extra bridges.

Order of Battle
There have been significant adjustments to the order of battle. Here’s an overview of some of the changes:
- Regimental and brigade HQs are now included
- New unit component naming conventions have been adopted for clarity and consistency
- Unit strengths have been revised to ensure consistency from nation to nation and unit to unit (battalion & company HQs are omitted, weapons company personnel are accounted for)
- Fort garrison strengths only account for the manning requirements of the close defenses (so cooks and electricians, etc., no longer contribute to fire resolution)
- Revisions to morale
- All duplicated units have been removed aside from a few air & naval units that cannot otherwise use attachments
- Air units are now attached to specific Army Groups to limit the geographic regions that can be used
- Various errors corrected, some overlooked units added.
Morale in particular has been heavily revised. French units that were awarded a regimental inscription for actions in the 1940 campaign are now at +1 morale. Unlike in 1914-18 and 1944-45, the French military authorities were highly selective about what regiments were honored for participation in the 1940 campaign - only about a dozen regiments were singled out for their battlefield performance (I was actually able to find an archival document describing the criteria that were considered). To compensate for the additional B troops, Fragile morale is now applied to all French forces.
Most French armored units have been downgraded from Quality C to Quality D. This is not to suggest that French tank crews were badly trained or had poor morale, but rather to reflect certain weaknesses that aren’t represented in the unit values, namely “overburdened” commanders, and the lack of radios in most vehicles. Despite being well-trained in the operation of their vehicles, French tank crews were generally unable to coordinate their actions because commanders doubled as gunners and orders, for the most part, could not be transmitted by radio. Heavily armed and armored French tanks can still pack a punch and present a formidable obstacle, but the lower quality provides a weakness that can be exploited.
Below are some additional details that have been modified or added.
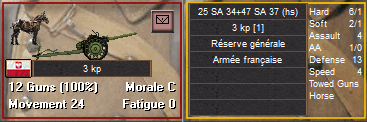
Here are some examples of revised unit strengths, showing a distinction between German 1st, 2nd, and 3rd Wave battalion organizations, including variation with 2nd Wave organization.

Some thinly spread border units are now broken into smaller components than companies. These are not meant to represent specific platoons.

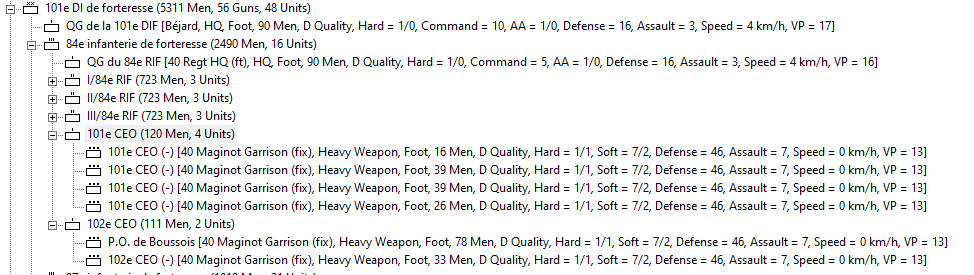
Additional fort garrisons have been added, plus fortress artillery for Verdun, Toul, and Épinal forts (these were still manned in 1940).


A new WDS team member provided some very interesting info on the Independent Polish Anti-Tank companies - some rather esoteric units that are difficult to research. I had previously assumed that they were likely equipped with 25mm guns, but it turns out they were mixed companies with both 25mm and 47mm pieces. This is now reflected in the unit values and art.
Additional Orders of Battle
Smaller OOB files have been created for later period scenarios. This enables us to reflect changes to Allied or German organization that can’t be accomplished through corps or army attachments and to declutter the master OOB by removing most duplicate units. Below is an excerpt from the Canal Line OOB, containing only the units needed for the Canal Line Scenario. By creating a separate OOB, we can properly represent changes to the OOB including the creation of temporary battlegroups and amalgamated units, like the French Groupement Tarrit and Groupement Vernillat.

Campaign Scenario
The most obvious update to the campaign scenario is the aforementioned expansion of the map. With this expansion we can represent all active fronts from Fall Gelb.
The northern addition includes 1st Cavalry Division’s advance across Friesland to the Afsluitdijk. By adding the northern provinces, the Allies must make an additional defensive calculation and the Germans have a potential “backdoor” by which they can outflank the Dutch Army, assuming, of course, that they can breach the formidable Kornwerderzand defenses. The eastward expansion includes Army Group C’s operations against the Maginot Line advance posts. As in the previous version of the scenario, the German player must inflict a decisive blow against France to achieve a major victory - either by replicating the historic advance to the sea, by capturing Paris, or by outflanking the Maginot Line. The new map provides a bit more room to operate should the German player pursue the latter option.
Below is the Jump Map, this time with units:

Here you can see some of the extra room behind Metz - it is no longer backed up to the edge of the map. You may also notice the fleshed out secondary road network and additional villages.

Another big change to the scenario includes the introduction of Strategy Options for both the German and Allied players. The German player will have some flexibility in the deployment of airlanding troops in Holland. While the initial waves (04:00 and 06:00 turns) are set, the German player has some choice where to land later reinforcements. This allows him to adapt to the situation as it unfolds and use the airfields that he controls. The historic options are always marked.
Additionally, the German player has strategy options for the deployment of the OKH reserve. He can generally deploy OKH reserve divisions to the Army Group of his choice, though there are a few exceptions.
Allied strategy options are a bit more limited. The Allied player can choose whether to replicate the historic deployment of the 224th Infantry Regiment to Walcheren or hold the unit at Dunkerque, where British reinforcements disembark, and where/if to employ naval support. There are no strategy options for the deployment of the GQG Reserve - it seemed as though these divisions could reasonably be sent anywhere from their historic arrival points and strategy options did not seem necessary.
Below are some examples of strategy options that are in play.

The various fortified lines have been heavily modified and fleshed out and now include Fort hexes (this a feature imported from the FWWC series). Below is a description of how the various fortified hexes are used:
FORT - Strong, modern, or modernized fortifications with extensive underground galleries and reinforced concrete. Includes Maginot Ouvrages, Westwall B-Werke, the modern or modernized forts of the Belgian PFL, and the Metz fortifications. The Maginot Ouvrage garrison units and the garrisons of the most modern PFL II forts have additionally elevated defense values above and beyond what the FORT hex provides. This makes them impervious to conventional artillery and most air units. 88s and certain siege artillery are the only means by which the Germans can inflict damage to these units.
Fort - Late 19th or early 20th century concrete forts or reinforced masonry forts. Underground galleries provide protection against small arms and light artillery fire, but Forts are highly vulnerable to siege artillery or aerial bombardment. Older French and Belgian forts, Dutch forts of the New Waterline.
PILLBOX - Strong fortifications; Network of fieldworks and extensive concrete construction.
BUNKER - Medium fortifications; strong line of fieldworks with extensive timber reinforcement but limited concrete construction OR cluster of concrete fortifications with limited supporting fieldworks
Bunker - Weak fortifications; Non-contiguous field works with little or no concrete construction OR thinly spread line of pillboxes with limited or non-existent supporting fieldworks; Also used for some obsolete masonry or earthen forts
Though it might seem as though additional fortified hexes would make the scenario much harder for the Germans, this isn’t always the case. The recent(ish) changes to the Alternative Assault Resolution rule (it now applies to armored units only, not to fortifications) mean that infantry and engineers are more capable in assaulting fortified hexes than they were previously. To be clear, PILLBOX and especially FORT hexes can still be very tough to crack if properly manned, but BUNKER and especially Bunker hexes are potentially vulnerable, particularly when manned by thinly spread, low quality infantry.
Here are a few examples of the new Fort Hexes:

Note that the Dutch Fort Spion is Fort rather than FORT and has no intrinsic garrison or artillery.
Another major change concerns bridge demolition. Neither the standard manual bridge damage rules nor wired bridge rules seemed to fit the campaign very well. While wired bridge rules do a great job of representing the prepared demolitions at the border, they start to feel arbitrary when applied to the rear areas and remove an element of gameplay. Manual bridge destruction rules are more engaging and do a better job representing the situation post May 13th or so, but there aren’t sufficient engineer units in the OOB to execute the prepared border demolitions. My solution had been to create two main versions of the campaign, one with wired bridge destruction and one with manual bridge destruction, with the pre-arranged border demolitions already executed in the manual version. There is still a wired bridge version for players to choose, but the manual bridge version now has small demolition teams to carry out the border demolition programs.
These demolition teams are small engineering units with sufficiently high assault values to consistently damage bridges (with some probability of failure). They are loaded into the reinforcement dialogue and will arrive fixed at their assigned bridge, mostly on May 10th and 11th with a few coming on the 12th. They are Single Use (meaning they are withdrawn after 1 turn in play) and have no hard or soft attack range, so they can only be used for the purposes of bridge demolition. If the demolition attempt fails, then the bridge will remain intact, and the Allied player will need to send an engineer unit if he wants to try again. There is a possibility that a demolition attempt could trigger German fire. The Allied player, for his own reasons (probably to facilitate a retreat or future advance), could choose not to use a demolition team, though it will still disappear at the end of the turn and if he later wanted to destroy the bridge, he would need to send a normal engineer unit. This is now my preferred version - I think it does the best job representing both the planned border demolition programs and the need to improvise when the Germans broke through Allied lines. Below are some of the demolition teams nested in the OOB, and images of Dutch, Belgian, Luxembourgish, and French demolition teams.

German Brandenburger operations are represented with more detail. Bridges that were seized prior to the main invasion are now controlled by small German special forces units. These facilitate the German advance into the Netherlands and better represent the consequences of the loss of the Gennep and other bridges. Brandenburger detachments are only placed at the bridges they historically seized - the various failed operations are not represented.

Release times have been totally redone. In the first version of the “Prucha” scenarios I was very concerned with providing the AI some constraints and preventing players from making very unrealistic and unbalanced moves early in the campaign (namely, rushing every imaginable French unit into the Ardennes). These are still valid concerns, but I had over-engineered the release times and deprived players of some needed flexibility. Additionally, there were several errors with some formations not released at the desired time. Now, all front line Belgian & Dutch units are released on May 10th-11th (with some rear area & security units released on the 12th) and all front-line French units are released by May 13th. Some general reserve units remain fixed after May 13th, but none are released later than the 17th. Additionally, more triggered releases have been provided so that if units are spotted, they can go into action.
Air support has also been heavily revised to reflect additional research. Air units that were principally involved in strategic bombing, anti-shipping operations, air superiority, or interdiction operations far behind enemy lines will be unavailable for much of the campaign, only becoming available on dates when they were known to have been used for tactical support or when they are known to have bombed targets very near the front. Allied units will cease to be available on the dates that their historical counterparts were withdrawn or destroyed. Of course, the game is unlikely to unfold exactly as the historic campaign, but the net effect is that both the Germans and Allies will only have intermittent access to heavy bombers and the Allied air forces will gradually be ground down. Some Allied air units are now only available at night.
Another important change is that Army Attachments are now available to both players. Historically, both the Germans and French radically re-organized their orders of battle to adapt to the rapidly evolving situation - the French effectively created a new Army Group from scratch by withdrawing commands from the General Reserve and the Maginot Line. Players will now have the ability to move corps from Army to Army in order to make similar adaptations.
Other Scenarios
All other “Prucha” scenarios have been revised and reviewed. Significant changes have been made to release times (with the aim of providing players more flexibility), AI orders, and some changes and corrections have been made to unit placement or reinforcements based on new research.
Here’s two very specific details that have been changed that are reflective of the care that has been put into these scenarios:
- From a more careful reading of Philson’s The British Army 1939-45: British Expeitionary Force Organisation and Order of Battle 10th May 1940 Volume 5, I realized that 56th and 58th Medium Regiments were attached to the Belgian 1st Infantry Infantry Division from May 23rd-25th. This is now reflected in the Courtrai, Lys, and Dunkerque Pocket Scenarios. Below you can see the Royal Artillery on the Lys.

- I/5e ChA is no longer present in the Dinant and Meuse scenarios. While this battalion had skirmished with the German advance guard, it was withdrawn to the Namur fortress area early in the morning of the 13th and was thus no longer present by the time these scenarios begin. This change will make it just a little bit easier for the Germans to cross the Meuse.
There are many more such small changes, too many to list.
New Scenarios
There are several new scenarios, some of which represent expanded versions of existing scenarios and others which present previously unexplored situations.
#0512_04_Grebbe_Line
This scenario starts a day into the Battle of Grebbeberg and covers the inter Grebbe Line, including the fighting at Opheusden and Scherpenzeel.

#0512_05_Wons
1st Cavalry Division assaults the Wons Position in Friesland. The Dutch are hopelessly outmatched, but the Germans have little time.

#0512_06_Sarre
The first two days of Operation Fackel, Army Group’s C’s limited offensive in front of the Maginot Line. There is a very interesting dynamic at play in this one - the French have a distinct qualitative advantage (the 1st Zouave Regiment is Quality B), but are thinly spread, outnumbered, and outgunned.

#0515_01C_Stonne
An expansion of the Stonne scenario which covers the 3rd North African Infantry Division and fighting around Mouzon.

#0517_02_Sambre
This is a large and complex scenario covering the destruction of the 9th Army. 7th Panzer has penetrated the Maubeuge Fortified Sector, but the Germans are strung out and potentially vulnerable to counterattack. To the north, the Germany 6th Army is pursuing the vulnerable French 1st Army. British and French reinforcements arrive from the north and west.

#0519_02_Rethel
A segment of Jean de Lattre de Tasigny’s tenacious defense of the Aisne.

#0520_01_Amiens
The fall of Amiens and Abbeville. Second line Allied troops have established roadblocks at key locations but cannot hope to stop the Panzers. The Germans must work against the clock.

#0527_01B_Abbeville
An expansion of the 1st Abbeville scenario which includes 7th Colonial Infantry Division’s fruitless counterattack at Amiens.

Unit Art
A few anachronistic or otherwise incorrect unit images have been replaced with all new art. I had never liked some of the unit images that used photos of re-enactors - though clean and clear I think they lack the “character” of the colorized photos that are used for most Panzer Campaigns infantry images. A new line of unit image based on colorized period photos have been created for the Prucha scenarios, though the reenactor images are still in use for the original and alt scenarios and can be swapped into the Prucha scenarios if the player desires (except those that are unquestionably anachronistic - turtle helmets weren’t in use in the BEF).
Here’s a sampling of new images for infantry, cavalry, engineers, and HQ type units:

Some mortars and AAMGs:

New Fortress Artillery Turrets:

And some new artillery images, mostly covering some pieces on the new Eastern half of the map, plus a horse-drawn version of the Vickers 6-inch howitzer used by the Belgians and Dutch:

Thanks, Mike, for the exhaustive listing. I for one am very exciting to see the additional work and depth being added to a fascinating campaign. If you don’t own Panzer Campaigns France ’40, the Summer Sale may be the perfect time to buy it! As mentioned above this additional content will be part of the Panzer Campaigns 4.01 updates later in the year and will be provided for free to existing owners, as always.

Mike and David are already working on their next title which may be as iconic as the French campaign. It will certainly be one of the most meticulously researched titles we have ever made available.
Finally, thanks to everyone that positively responded to our Japan ’45 After-Action Report. We plan to have the second part of this After-Action Report out very soon. In tandem, the revised Japan ’45 campaign that was being play-tested will also be made available. More to follow and please take advantage of the sale prices to try something new!


I’m hoping that the 3D Isometric broken terrain doesn’t get broken with this update. Right now it works with the current France 40.
https://www.theblitz.club/message_boards/showthread.php?tid=74322&highlight=3D+broken
I really do hope that the Prucha’s scns combined ….. from ardenness/sedan infiltration until breakout to France coast
Wow!! I can’t wait to give the expanded France 40 a go. I’ve really enjoyed the vanilla France 40 scenarios in the past. Looks fantastic and obviously a tonne of detailed research and effort has gone into this. Thank you Mike & David for all the effort and hard work.
I am very stoked to install France ’40 v4.01! I am currently engaged in a Solo HTH Prucha Campaign and am considering dropping it and wait for this new exciting, expansive update, my sincere gratitude to Mike and his team for the new content (especially the graphics).
I wanted to ask if the 3D map will receive much needed refresh. I play most of my Panzer campaigns on the 3D map/Icon view but find the quality and resolution of the graphics frustrating.
Finally I cannot praise the WDS staff enough for your efforts to revamp and bring added value to the JTS simulations.
BRAVO Gents!
Hi all, I know that it is off topic compared to France ’40, but I totally agree with those who hope to one day see a new series of games set after the Napoleonic wars. The 1870 Franco Prussian War, the 1866 Austro Prussian War, the three Italian wars of independence (1848,1859, 1866) with the battle of Solferino, one of the largest battle after Napoleon and before the First World War, the 1853 Crimean War and so up to the Russo-Japanese War of 1905. I hope that one day the WDS staff will making what I believe is a dream for many of us
Leave a comment