

Sheldt '44 Play Test!
With our next planned release to be Panzer Campaigns Scheldt ’44, Mike Prucha has shared a sample play test from this upcoming title.

David Michas and I have been playing #1001_01_Scheldt_Campaign_I “In Arnhem’s Shadow,” a scenario covering the activities of the 1st Canadian Army and the British XII Corps during the first half of the Scheldt Campaign from October 1st through the 17th. During this time the 21st Army Group was overextended and committed to more tasks than it had the resources to carry out. Montgomery had devoted the bulk of his manpower (and supply) to the defense of the “Island” south of Arnhem and the clearance of the Maas Salient, two tasks essential toward his goal of starting an offensive into Germany via the Reichswald in October. With Montgomery still fixated on making something of his 2nd Army’s Market Garden Offensive, he left the over-extended 1st Canadian Army the all-important task of clearing the Scheldt estuary and freeing the port of Antwerp to Allied shipping. II Canadian Corps was ordered to clear the remaining German presence south of the Scheldt (the so-called “Breskens Pocket” or “Fortress Scheldt South”) while the UK I Corps simultaneously advanced northwest from Antwerp to isolate the Zuid-Beveland Isthmus and attack northeast to capture Tilburg and relieve pressure on the 2nd Army’s flank. Montgomery’s directive was problematic. II Canadian Corps was in no position to take immediate action against the Breskens Pocket as the 3rd Canadian Infantry was still mopping up Calais. I Corps’ orders seemed almost contradictory – to make simultaneous thrusts in the opposite direction is hardly an efficient use of force. Making matters worse, the weather had turned against the Allies. Heavy rains had turned the flat Dutch landscape into a mire and persistent fog, low-lying clouds, and occasional thunderstorms were to prevent the consistent application of air power. Though on paper the 1st Canadian Army possesses a significant advantage over the German 15th Army, bad weather, low supply levels, untimely withdrawals, and steep victory conditions have the potential to make this scenario a serious challenge for the Allied player.
The campaign map follows (all images can be clicked for full size);

Below I’ll summarize the events of the first eight days of the campaign from my perspective as the Allied player, followed by some general observations about game play.
Summary
October 1st
The campaign starts slowly. Most of the Allied forces are fixed on the first Day. I recreated the historic Allied move by attacking Brecht with the 5th CIB and Zondereigen with the Polish 3rd Rifle Brigade. The Canadians took Brecht easily. The Poles had a difficult time around Zondereigen but captured the village late in the afternoon. A battery of 88s dealt some serious damage to the Polish tanks.


October 2nd
I had 6th CIB “leapfrog” 5th CIB to allow the attackers from the previous day time to recover fatigue and to resupply. 6th CIB initially made good progress but was halted by stiffening German defense in the woods east of Fort van Brasschaat. Persistent disruption and lack of supplies seriously impeded the Canadian advance. Meanwhile, the 4th CIB, now released, attacked north from Antwerp to the suburb of Merksem but was unable to make much headway. Further east the Poles, supported by elements of 49th (West Riding) Infantry Division, pushed as far as the edge of the woods south of Baarle-Hertog. In the XII Corps sector, elements of 7th Armoured Division attempted to pinch of a forward German position at Geffen. The Germans were routed, and the village occupied at dusk, though they took fewer prisoners than I should have liked.
 October 3rd
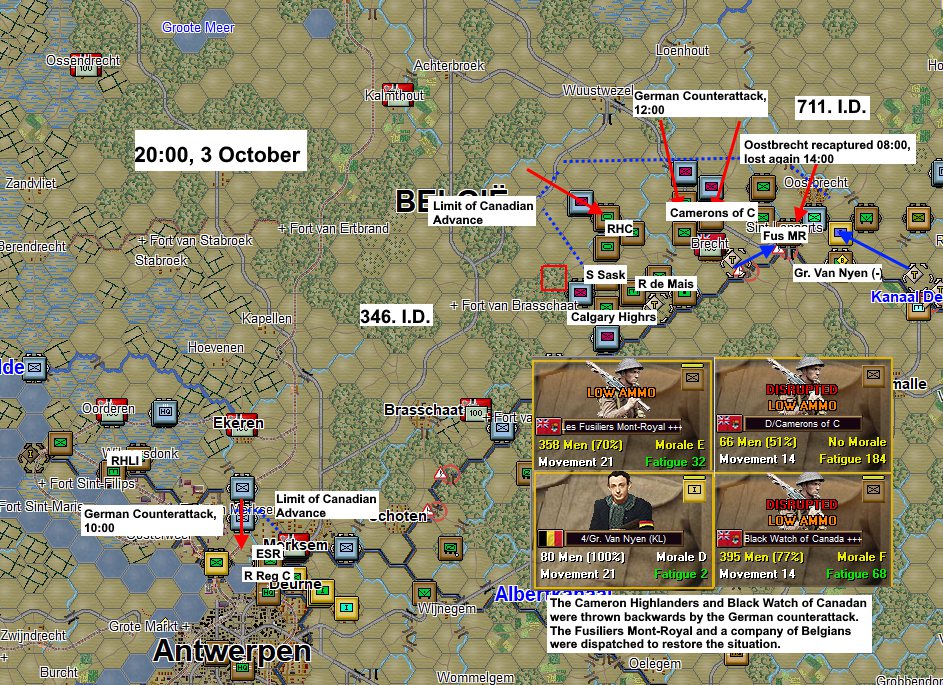
Storm conditions played a huge role in the fighting this day by grounding the RAF and reducing the effectiveness of Allied artillery. I attempted to bypass the resistance in the woods by attacking northwest toward Wuustwezel with the now recuperated 5th CIB. The brigade gained a few kilometers early in the day, but about 10:00 the enemy counterattacked. 5th CIB was sent reeling backwards. Pressure against 5th and 6th CIB was maintained throughout the day and both brigades gave ground – some elements pushed all the way back to the canal. The counterattack petered out before dusk and some ground was recaptured. Counterattacks were also conducted against 4th CIB’s small bridgehead in Merksem. As serious as the situation was on the front of the 2nd CID, a late-afternoon attack by the 711th Infantry Division against Bobforce (a brigade-sized formation of anti-aircraft gunners fighting as infantry) threatened to snap I Corps in half. I dispatched the Polish 10th Armoured Brigade, then enroute to reinforce 3rd Rifle Brigade at Baarle-Nassau, to deal with the situation. The Polish tanks and infantry concentrated in the vicinity of Merxplas for dawn counterattack. The rapidly advancing German infantry burst through Bobforce’s lines directly into the Polish position. The tanks opened fire and the lead German company put to flight. Elsewhere the front remained quiet as I waited out the storm. 15th (Scottish) Division was withdrawn on this day and relieved by 51st (Highland).
 October 4th.
Unable to make any headway in Merksem, I sent a company of the RHLI and some Toronto Scottish, then defending the Antwerp docks, to attack the enemy at Oorderen. I doubted such a small force could have much success with limited artillery support, but I hoped that it might make enough of an impression to draw some forces away from Merksem. I was wrong on both accounts – Oorderen was captured in short order but the attack failed to relieve pressure on my bridgehead. In the Brecht-Braaschaat sector both sides licked their wounds. Neither 5th nor 6th CIB were in any condition to attack after the previous day’s violence. At Merxplax, 10th Polish Armoured Brigade began its offensive to relieve pressure on Bobforce. The Polish armour struck right at the seam between 711th and 719th Infantry Divisions. Tired from the previous day’s fighting, the German Grenadier regiment was routed. The only other forces in the area were some Landesschützen and an Ost battalion, neither of which put up meaningful resistance. 10th Polish Armoured ended the day just a few kilometers southeast of Minderhout. To the east 49th Division’s 56th and 157th Infantry Brigade attacked in the Ravels-Weelde sector with the aim of seizing the Turnhout-Poppel road. Both villages were captured, and the road secured as a pontoon bridge was completed northeast of Turnhout which enabled the remainder of the division to cross over the Turnhout Canal. Elsewhere the 53rd (Welsh) and 51st (Highland) applied light pressure while 7th Armoured Division attacked and seized Vinkel.
October 5th
2nd Canadian Infantry Division took to the offensive again on this day. 4th CIB finally captured central Merskem shortly after dawn though the battle for the extremities of the suburb and the docks was far from over. Meanwhile 5th CIB renewed the attack to the southwest and, after a daylong battle, was successful in capturing the woods east of Fort van Brasschaat. The Polish Armoured Brigade changed direction and proceeded northeast to Baarle-Nassau. They encountered only minimal resistance along the way and by nightfall the entire Polish Armoured Division had concentrated around the town. In the 49th (West Riding) sector, the 56th and 147th advanced virtually unopposed to Poppel. Here they were halted by the fiercest enemy resistance yet encountered. The British infantry and supporting Canadian armor bogged down under intense fire and multiple assaults failed to dislodge the enemy. By nightfall the town was still in German hands. The 2nd Battalion, Gloucestershire Regiment took especially heavy casualties, losing almost 40% of its strength in the attacks. Threatened with encirclement, the German 245th Infantry Division retreated in the direction of Tilburg. The thinly spread 53rd (Welsh) Division (missing one brigade and some supporting arms) advanced behind the retreating Germans. Hoping to pressure Tilburg from all direction, I attacked between the Wilhelmina Canal and the Dommel with 51st (Highland)’s 152nd and 153rd Infantry Brigades. They captured Best and Liempde late in the afternoon. In 7th Armoured Divison’s sector, the Germans counterattacked, reclaiming both Vinkel and Geffen. The panic that had seized the enemy in the previous days now struck the Queen’s Brigade. In the western extremity of the map, elements of the 3rd Canadian Infantry Division and supporting artillery began to arrive opposite the Breskens Pocket before dusk.
October 6th
The offensive finally gained some substantial momentum on this day. Finally concentrated south of the Breskens Pocket, the 7th CIB, backed up by incredible artillery support, forced a crossing of the Leopold Canal and established a small bridgehead near Sint Laureins. 4th CIB made good progress north of Antwerp. Fort van Merskem fell and the entire suburb liberated. Meanwhile 5th and 6th CIB continued their inexorable westward crawl as they captured the next patch of woods. Now only about ten kilometers separated the two wings of the division. The enemy maintained his defenses on the Turnhout Canal between Schoten and Braaschaat – these companies were now clearly threatened with encirclement. 1st Polish Division, now concentrated as a single entity, well-rested and fully supplied, struck northward from Baarle-Nassau to Alphen. They met heavy resistance in the Alphen woods, but the village was captured around the end of the day. Recce elements bypassed the woods and by the nightfall were just two kilometers shy of Glize. 49th (West Riding) finally overcame the defense at Poppel around midday and advanced into the woods to the northwest. It seemed as though the enemy was retreating to Tilburg. 51st (Highland) Division made modest progress, its entire front advancing two kilometers. 53rd (Welsh) was fixed on this day and some elements withdrawn.

October 7th
In the Breskens Pocket, 7th CIB’s tenuous bridgehead weathered several German counterattacks as the sappers struggled to put a bridge over the canal. After a day of intense combat, the two wings of 2nd CID were finally linked up around Brasschaat, 4th CIB advancing northeast from Mersksem and 4th and 5th CIB southwest from Brecht/Fort van Brasschaat. Ekeren was also liberated. The Shermans of the Fort Garry Horse proved particularly valuable, charging ahead of 5th CIB and cutting of a portion of the retreating enemy column. A few hundred Germans were isolated and captured near Brasschaat. Further east, 1st Polish AD, 49th (West Riding), and 51st (Highland) advanced behind a retreating enemy, tightening the Allied grip on Tilburg. The Poles were engaged in some fierce clashes between Alphen and Riel, but otherwise the enemy seemed content to retreat to the marshes and woods which protect the southwestern approaches to the city.

October 8th
Visibility was reduced to one kilometer on the 8th. I spent the day reorganizing and consolidating the gains of the previous days. 2nd Canadian Infantry, 1st Polish Armoured, and 49th (West Riding) all needed time to recover from fatigue and disruption and to resupply. No major offensive actions were undertaken, and little contact was made in with the enemy.
Below is a sequence of jumps showing the progress of the campaign, each taken at 06:00;

Though the narrative here ends on the 8th (about halfway through), David and I have played several days beyond. I don’t wish to divulge too much about my present dispositions and intentions but suffice to say that my offensive against Tilburg on October 9th was an abject failure. 2nd CID’s attack the same day showed some promising early results, but since the 10th has bogged down, largely because David had deployed Kampfgruppe Chill to the area. The only area where I seem much motion at this point is in the Breskens Pocket.
Observations
Some general observations about gameplay:
The divergent track of objective hexes presented to I Corps – one northeast toward Tilburg and the other northwest to Woensdrecht – presents a serious challenge to the Allied player. As I Corps necessarily splits and advances in two different directions, command and control and resupply become an ever-increasing issue and a major impediment to Allied success.
- It is very difficult to maintain momentum because the Allied infantry (mostly rated C or D) are prone to disruption, supply problems are chronic, and mud conditions largely prevent any rapid exploitation.
- Related to the above, it is advisable to keep a battalion (or even a brigade) in reserve behind an attack. Once the initial attack bogs down due to disruption or low ammunition, the reserve can continue the effort and perhaps grind out a few more kilometers. As the Allied lines expand and the divisions are more thinly stretched, this tactic becomes less and less workable.
- The Allies most powerful asset is the Royal Artillery. My artillery has caused the bulk of enemy casualties and a preparatory bombardment is a pre-requisite to any successful infantry attack.
- Its best to keep irregular forces (resistance fighters) out of direct contact with the enemy as the they simply do not have the firepower or manpower to stand toe to toe with a German infantry company (much less a battalion). They are valuable in that they can be used to fill space between larger Allied formations and keep tabs on weaker sections of the German line. The ability to move from enemy ZOC to ZOC has proved to be particularly useful in the tight confines around the Antwerp docks.
- The StuG brigades can provide the weaker German infantry with a solid “backbone.” I largely attribute David’s successful retreat to Tilburg on the 6th and 7th to the intervention of two (or three?) StuG brigades. The StuGs can fire effectively on both Allied tanks and infantry at range and elements of 49th Division and 1st Polish Armoured were frequently stopped in their tracks under fire from the StuGs.
- Overall, the weather conditions favor the Germans. While there have been a few clear days, more often than not visibility has been restricted and there have been intermittent thunderstorms which effectively halt offensive operations.
We have also been taken the playtest as an opportunity to look for bugs or errors or to identify and resolve balance issues. In playing through the game, David and I have both noted some spelling or labeling errors or inconsistencies which have been duly addressed. A major balance issue that became apparent was that the 1st Polish Armored was seriously outperforming its historical counterpart. Steps have since been taken to weaken it a bit and bring its performance more in line with reality.
David was very succinct in his analysis;
If you like windmills, foxholes filled with water, often grey skies, cathedrals for single mountains and fighting with your back against an invisible wall? This scenario, #1001_01_Scheldt_Campaign_I "In Arnhem's Shadow" is for you! At every turn you will find yourself in crisis management. It's very stimulating!
Mike has also been kind enough to provide some further screenshots of a few of the scenarios that will be included in the game.
Bolougne

Breskens

Overloon

Ten Aard

Vitality 1

Zuydcoote

And finally, some examples of a few of the oddball units and foreign artillery in the German arsenal, you will be playing with or against;

We expect to be able share more as Panzer Campaigns Scheldt ‘44 gets closer to release!


Leave a comment